Friday, January 28, 2011

Chicken and Broccoli with a Twist!

I love cookbooks. I constantly peruse them at the store, impulsively buy them, or add them to my Christmas list. As of now, I have about 20. Even though I have used (on average) 0.8 recipes from each, I still want more! I found last night's recipes from Giada's Everyday Italian and Ina Garten's Barefoot Contessa: Back to Basics. It is a simple meal, easy to make, and turns out beautifully! These two recipes are easy to make together because some ingredients overlap. I have taken some liberties with these recipes to make them for 2 people/easier to follow/post. Here it is below:


Giada's Chicken Saltimbocca 
(Fun fact: "saltimbocca" means "leap in the mouth"- aka the food will jump into your mouth!)


Ingredients

  • 1 (10-ounce) box frozen spinach
  • 3 tablespoons of olive oil
  • Salt
  • Freshly ground black pepper
  • 6 chicken cutlets (see below!)
  • 6 paper-thin slices of prosciutto
  • 1/4 cup shredded Parmesan cheese
  • 1 14-ounce can reduced-sodium chicken broth (I just used bouillon because it's cheaper and takes forever to go bad)
  • 3 tablespoons fresh lemon juice (from 1 lemon)

1. Thaw the spinach by putting it in the microwave for about 2 minutes. Once it is thawed, squeeze the extra water out.

2. In a small bowl, toss the spinach with 1 tablespoon olive oil to coat, season with salt and pepper.

3. Prepare the chicken cutlets. This shows how the chicken should be cut. I went to my butcher, bought 2 chicken breasts, and asked him to filet them open. You can easily do this with chicken breasts at home. Once they are open, you can pound them thinner with any heavy object (be sure to cover the chicken with plastic wrap to prevent the germs from spreading!). The thinner you make each cutlet, the easier it will be to roll them up.

4. Place the chicken on a flat work surface and season with S&P. Layer each cutlet with 1 slice of prosciutto, an even layer of spinach, and top with some of the cheese.

5. Beginning at the tapered end of the cutlet, roll each piece as for a jelly roll and secure with a toothpick. Maybe it's just me, but I don't know what a "jelly roll" is. Sooooo, basically, make it look like a fat burrito. 

6. In a large skillet, heat some olive oil over high. This will make the browning easier. Add the chicken rolls and cook each side until brown, about 2 minutes. This pic is before they have been turned once, aka, why they are still raw. 

8. Once all sides are browned, add the chicken broth and lemon juice to the skillet. As you can see in my picture, I didn't brown each side enough. I just sort of "cooked" each side. They required more cooking once I thought I was finished and it was a huge pain! So make yours look like the top 2 pieces of chicken.

9. Reduce the heat to medium, cover and simmer until the chicken is cooked through, about 4 minutes. I don't have a lid for this skillet so I just covered it with foil.

10. Once cooking is complete, transfer the chicken to a plate. You can reduce the sauce and use it to top the chicken if you'd like, I opted not to because we were starving at this point. See below for entire meal picture!

Parmesan-Roasted Broccoli

Ingredients
  • 1-2 pounds of broccoli (I used 1 head because it was just the two of us, you could easily eat 1 head/person!)
  • Garlic (1-2 cloves per each head of broccoli, depending on how much you like garlic)
  • A few leaves of basil
  • Olive Oil
  • Salt and Pepper
  • Grated Lemon Zest (when you zest a lemon, you just want the colored part of the peel, stop when you get to the white)
  • 1-2 tablespoons lemon juice (again, depending on how much you like lemon flavor)
  • 3 tablespoons pine nuts (I could not find pine nuts at my grocery so I used sunflower seeds, it worked well!)
  • 1/4 cup Parmesan cheese

1. Preheat the oven to 425.

2. Cut the broccoli florets from the thick stalks, leaving an inch or so of stalk attached to the florets. (PS: a "floret" is the bunchy part on top) Cut the larger pieces through the base of the floret tops and pull apart. This just makes for easier roasting and eating.

3. Chop the garlic and basil. Even if you know how to chop, I think you'll be fine not having a picture of the basil... especially because I don't have a pic =)

4. Place the broccoli florets on a sheet pan or in a pyrex. Spread them out so they are in a single layer. Drizzle with enough olive oil to coat and toss with the garlic. I scooted the mix all to one side so the flavors would mix better. Place in the oven for 20-25 minutes.


6. While the broccoli is in the oven, combine the lemon zest, lemon juice, and some olive oil in a small bowl.

7. While broccoli is still cooking, roast the pine nuts/sunflower seeds. Whenever you roast seeds or nuts, just place them in a dry skillet, single-layer, over medium heat. Once you can smell the natural aroma, they are finished. Be careful because they burn easily!

8. The broccoli is done in the oven when it is crisp-tender and some of the floret heads are browned. When it is finished cooking, immediately toss with lemon juice mixture, nuts/seeds, cheese and chopped basil.
This broccoli turned out amazing! I will definitely be making it again. 

Enjoy!

Friday, January 21, 2011

Panini Press

For my birthday, my parents gave me a panini press! I had been eyeing one for a long time now. My parents have one and it gets used all of the time. When there is a big group at their house, it is easy to get out the sandwich toppings, have people make their own sandwich, and grill. This panini press was on Oprah's Favorite Things this year so I was worried it would be sold out everywhere. Luckily, my mom bought this for me back in November. You can also use this press as a grill for meats, think George Foreman.


Of course, I wanted to use my new gadget immediately. I searched the internet for a simple panini recipe and I found a great one! You can use this recipe and substitute your favorite ingredients. Here it is!


Prosciutto and Fontina Panini


Ingredients

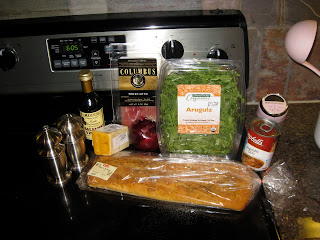
  • 1 package of Focaccia (Italian flat-bread) I found this in the bakery at the local grocer
  • 8 Slices Prosciutto (in the pre-sliced deli meat section or at the deli)
  • Fontina cheese
  • Arugula
  • Red onion slices, separated into rings
  • Balsamic vinegar
  • Fresh cracked black pepper
  • Salt


1. Turn on the press to warm (mine has a "panini" setting)


2. Prep all of your ingredients: slice the bread, cheese and onion


3. Open the bread, place the cheese, meat, arugula and onion. Drizzle with balsamic vinegar and top with S&P.


4. Spray the press with cooking spray and place the sandwiches at the lowest point. I learned that I was supposed to do this after the pic!


5. Grill until crisp and the cheese is melted, about 5 minutes


6. Slice! I used my new Panini Spatula. The silicone tips are great for the non-stick press and it is also used to support while slicing.


Pic after slicing:


I served with some store-bought soup. Enjoy!


Thursday, January 20, 2011

Birthday Brunch

For my birthday earlier this week week, I wanted to get my girl friends together for a casual brunch. I decided to have people to my house because A) It's easier/cheaper/casual and B) I love having people over. I was already getting anxiety about making reservations, splitting the check, and feeling stuffy! Everyone was more than happy to help out by offereing to bring or do something. Brunches like this are easy to pull off, especially with a little help! Here are some pics with recipes and how-to.


For the menu:
Rachael Ray's Elsa's Egg Cake
Build-Your-Own Waffle Bar
Fruit Salad
Confetti Cupcakes
Coffee
Mimosas 


Egg Cake
This is a family favorite! I have written a few alterations to fit the way we like it. I've made this for a brunch shower in the past and it was a hit. You can easily double or triple the recipe to fit your group. It can be put together the night before, just bake right before you are ready to serve. Note: the pics are from the doubled recipe. 


Ingredients (to serve 4):

  • 6 slices thick-cut bacon (we always use 1 lb. pre-cooked sausage)
  • 1 medium onion
  • Salt and Pepper
  • 3 cups soft bread (1/2 bakery loaf)
  • 1 cup plus 1/4 cup shrdded sharp white cheddar cheese (I could only find yellow)
  • 8 eggs
  • 3/4 cup half-and-half
  • Few dashes of nutmeg
  • 1/2 cup Parmigiano Reggino Cheese


1. Prehead the oven to 400F. Lightly spray an 8-inch cake pan with cooking spray. I use an 8-in square Pyrex.


2. Slice the sausage. I cut each piece in half so there would be lots of sausage spread out. 


3. Brown the sausage and set aside.


4. Chop the onion.


5. Use some of the sausage fat to brown the onion until tender, about 5-6 minutes. Season with salt and pepper. It will look like this when ready:


6. While the sausage and/or onions are browning, cut the bread into small cubes. (Thanks for the help sister!)


7. To the cake pan, add 1/2 of the bread, 1/2 of the cheddar cheese, the onions, and 1/2 of the sausage. I forgot to take a pic of this but it's pretty self-explanatory! 


8. In a medium bowl, whisk together the eggs, half-and-half, a few dashes of nutmeg, and some S&P. Hint- whisk the eggs before you add anything else so you can see if there are any unbroken yolks, we learned this the hard way...


9. Pour 1/2 of the egg mixture over everything in the pan. 


10. Add the rest of the bread, pressing down slightly, the remaining cheddar cheese and sausage to the pan. Pour the rest of the egg mixture over the top and sprinkle the Parmigiano Reggiano over everything.


11. Bake until puffy and golden brown on top, about 20 minutes. Enjoy!


Waffle Bar
I got a waffle maker from Williams-Sonoma a few years ago and love it! It is perfect for weekend breakfasts or breakfast-for-dinner. My sister, Brooke, had the idea to do a "choose your own toppings" waffle bar for a dinner I had a few months ago. I think it is a great idea to get people involved at a party. Anything where your guests help make their own drink, food, dessert is fun. My friend Charlotte brought some toppings: cool whip, chocolate chips, and berries. I always keep syrup stocked in my pantry for waffles. I bought waffle tongs from Williams-Sonoma and I found this cute syrup pitcher from WS too.  I made the batter before my guests got there so it was read to go!


Fruit Salad
My friend, Evan, pitched in and made a wonderful fruit salad.


Confetti Cupcakes
For dessert, I used store-bought cupcake mix with whipped white icing. With cake mix costing $0.99, it would seriously be cheaper (and easier!) than making cupcakes from scratch. I was so excited to finally have an excuse to buy the Williams-Sonoma cupcake/muffin tins. For decorations, I bought clear sugar sprinkles to go on top. I also found a cupcake decorating kit from (again) WS. I couldn't find it online but it had a set of 24 themed paper liners and paper toppers. I used a fondant set my mom bought me a few years ago to make initials of each of the guests. Super easy! For display, I borrowed my mom's cupcake stand. This thing has been used more times than I can count. 


Coffee
I had coffee ready for when the guests arrived. I like to collect different coffee cups so each person will have their own print and style. Nerd alert: picking out which mug I want to use is a highlight of my day.


Mimosas
Enough said. Friends volunteered to bring the ingredients! 


We had a great time getting together in this casual celebration.


Monday, January 10, 2011

Beth's Wedding

My lovely sister, Beth, got married this weekend! (Background: I am the youngest of 4 girls. Beth is #2) She married a great guy named Fred that my family adores.

They had an intimate wedding in the garden room of a neat restaurant in Houston, Baba Yega. We started with some family pics. Because everyone lives in Houston, we are able to get together all of the time. However, it's usually casual gatherings and photo opportunities are limited. Since everyone was dressed up, I took advantage!

The Mommy and the Daddy

Mommy, Emily, Brooke, Dad

Emily and Brooke

The boy and me

4 Girls: Dawn, Beth (the bride), Emily and Brooke

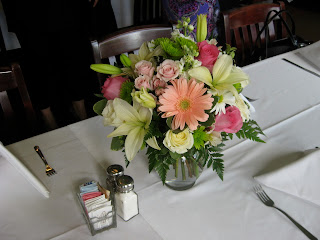
Beth had a florist make center pieces for the tables. She said her cats would eat them if she took them home so I got to take one. Win!

Saying their vows.

For dinner, they had a HUGE spread of food (that I neglected to take a picture of) and it was amazing. I want to go back ASAP for another meal. Apparently they have a great Sunday brunch so check it out if you live close.

They also had a variety of cakes that were made by Baba Yega. Delish!

Fred is a crazy good Scrabble player. He plays in tournaments and does very well! You do NOT want to play this guy on Words with Friends. Beth's friend made these wedding favors in homage to Fred. Each baggie had 4 Scrabble letters that spelled out a wedding-theme word. It was so neat! She even put magnets on the back so you could put them on your fridge. I took "V-O-W-S" for a scrapbook page and kept "L-O-V-E" for my fridge.


Congrats to the newlyweds!

Sunday, January 9, 2011

NYE Dinner

For NYE this year, I wanted to make a special dinner. My friend, Ian, was going to join the boy and me for the meal. I searched the Food Network website and Oh My Goodness, I found a winner. This recipe is in thanks to my dear friend Bobby Flay. This is my first big recipe to put up, so bear with the pictures. After taking them alone (the boy was busy moving), I realized I need some adjustments. First: I will get a non-white cutting board. Second- I will wait until I can have someone take pictures as I work.

You can look at the entire recipe here. I ended up only putting up the potato dish because I had somewhat of a disastrous meal.
1. I clogged my kitchen sink with the potato peels. You could not drain that thing to save your life. The poor garbage disposal just spun and spun to no avail. I started to freak. Ian happened to call during my mental breakdown and he said he did the same thing on Christmas night. He had to use a plunger to unstop it! When Johnny got to my house, he had to spend 20 minutes doing the same thing. I felt really bad because he had spent all day moving and was exhausted. I am sure I was not his favorite person right then. Thanks! Love ya! You're the best!
2. My camera battery died. That is the real reason I could not do pictures of the beef dish. However, it was amazing. The recipe was actually really easy to make and easy to follow. I recommend it to impress your significant other for a birthday/anniversary/random Wednesday.

On to the potatoes...
Onion and Potato Gratin:
Ingredients

2 tablespoons olive oil
3 large Spanish onions (My regular grocery didn't have "Spanish" onions so I just bought "sweet")
2 cloves garlic
Salt and freshly ground black pepper
4 large potatoes (the only potatoes I could find were small so I bought 8)
3 tablespoons balsamic vinegar
1 1/4 cups heavy cream (I used half-and-half)
1/4 cup finely chopped fresh parsley
1 cup grated Gruyere cheese
I like to do my prep first so I can cook more efficiently. This is my adaptation of the recipe.


1. Thinly slice the onions.

2. Chop the garlic. I used my chopper to do it quickly.

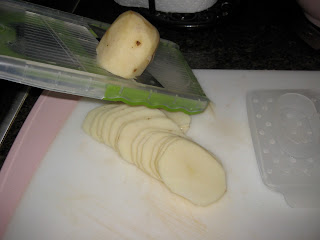
3. Peel and thinly slice the potatoes. In my stocking this year, Santa gave me a mandolin. He got it at HEB! It is my new favorite kitchen gadget. 


4. Heat the olive oil in a large skillet over medium heat. 

5. Slowly caramelize the onions. At first, it will seem like a LOT of onions, but they will cook down. You will need to saute the onions for about 25 minutes. It will look like this when it is ready: 

6. Add the garlic and balsamic vinegar and cook for 2 minutes. 

7. Preheat oven to 375 degrees F. 
8. Butter a 9-inch baking pan. You can just use cooking spray.
9. Place a layer of potatoes on the bottom and season with salt and pepper. Spoon 1/5 of the onion mixture over the potatoes and top with 1/4 cup of the heavy cream and a tablespoon of parsley. 

10. Repeat for 5 layers. Somehow, I ended up with too many ingredients so I think I did 4 layers.

11. Sprinkle the cheese over the top of the potatoes. 

12. Bake for 50 to 60 minutes, or until the potatoes are soft and the cream has been absorbed. Before I made the recipe, I looked at the reviews and people had recommended to bake for longer. I cooked it for 1 hour 15 minutes. 

We failed to take a "finished" picture because we were too excited and immediately dug in. Here is what it looked like after the beginning of service. Yum!


 Here is a pic of the meal with the beef dish. Amaze.